Traefik Ingress Controller
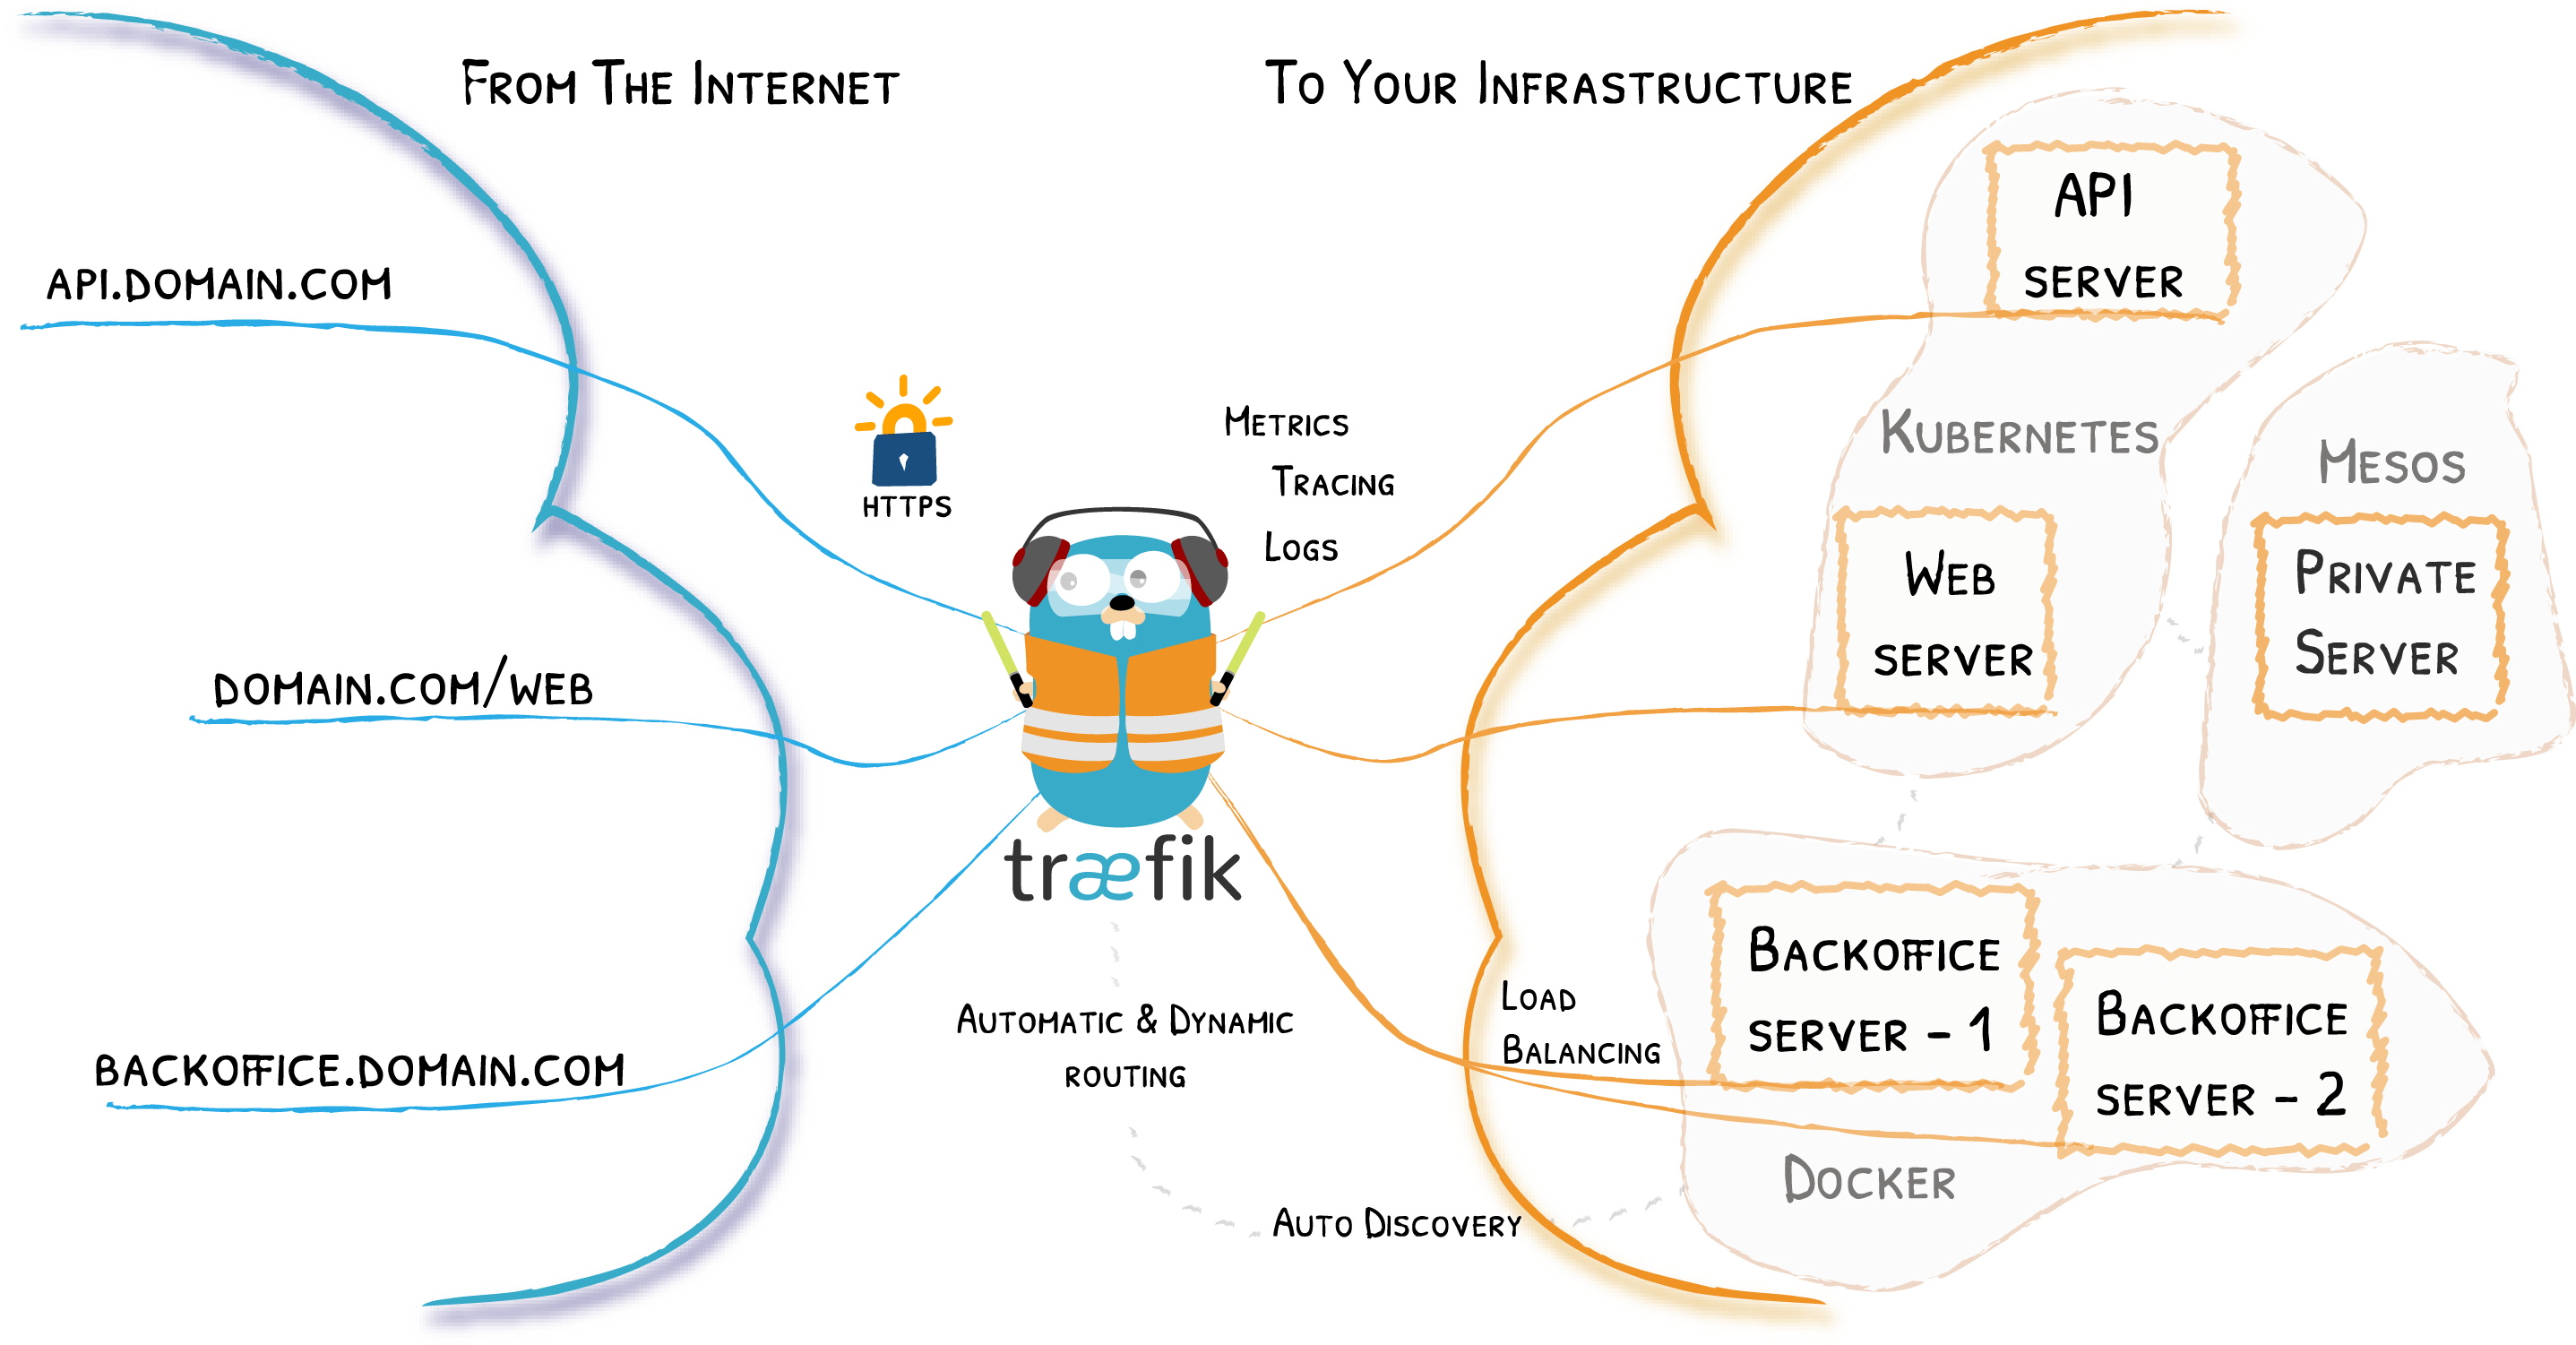
Unlike grumpy ol' man Nginx  , Traefik, a microservice-friendly reverse proxy, is relatively fresh in the "cloud-native" space, having been "born"
  in the same year that Kubernetes was launched.
Traefik natively includes some features which Nginx lacks:
- Ability to use cross-namespace TLS certificates (this may be accidental, but it totally works currently)
- An elegant "middleware" implementation allowing certain requests to pass through additional layers of authentication
- A beautiful dashboard
Ingredients
- A Kubernetes cluster
- Flux deployment process bootstrapped
- A load-balancer solution (either k3s or MetalLB)
Optional:
- Cert-Manager deployed to request/renew certificates
- External DNS configured to respond to ingresses, or with a wildcard DNS entry
Preparation
Namespace
We need a namespace to deploy our HelmRelease and associated ConfigMaps into. Per the flux design, I create this example yaml in my flux repo:
apiVersion: v1
kind: Namespace
metadata:
  name: traefik
HelmRepository
Next, we need to define a HelmRepository (a repository of helm charts), to which we'll refer when we create the HelmRelease. We only need to do this once per-repository. In this case, we're using the official Traefik helm chart, so per the flux design, I create this example yaml in my flux repo:
apiVersion: source.toolkit.fluxcd.io/v1beta1
kind: HelmRepository
metadata:
  name: traefik
  namespace: flux-system
spec:
  interval: 15m
  url: https://helm.traefik.io/traefik
Kustomization
Now that the "global" elements of this deployment (Namespace and HelmRepository) have been defined, we do some "flux-ception", and go one layer deeper, adding another Kustomization, telling flux to deploy any YAMLs found in the repo at /traefik. I create this example Kustomization in my flux repo:
apiVersion: kustomize.toolkit.fluxcd.io/v1
kind: Kustomization
metadata:
  name: traefik
  namespace: flux-system
spec:
  interval: 15m
  path: ./traefik
  prune: true # remove any elements later removed from the above path
  timeout: 2m # if not set, this defaults to interval duration, which is 1h
  sourceRef:
    kind: GitRepository
    name: flux-system
  healthChecks:
    - apiVersion: apps/v1
      kind: Deployment
      name: traefik
      namespace: traefik
ConfigMap
Now we're into the traefik-specific YAMLs. First, we create a ConfigMap, containing the entire contents of the helm chart's values.yaml. Paste the values into a values.yaml key as illustrated below, indented 4 spaces (since they're "encapsulated" within the ConfigMap YAML). I create this example yaml in my flux repo:
apiVersion: v1
kind: ConfigMap
metadata:
  creationTimestamp: null
  name: traefik-helm-chart-value-overrides
  namespace: traefik
data:
  values.yaml: |-
    # <upstream values go here>
That's a lot of unnecessary text!
Why not just paste in the subset of values I want to change?
You know what's harder than working out which values from a 2000-line values.yaml to change?
Answer: Working out what values to change when the upstream helm chart has refactored or added options! By pasting in the entirety of the upstream chart, when it comes time to perform upgrades, you can just duplicate your ConfigMap YAML, paste the new values into one of the copies, and compare them side by side to ensure your original values/decisions persist in the new chart.
Then work your way through the values you pasted, and change any which are specific to your configuration. It may not be necessary to change anything.
HelmRelease
Lastly, having set the scene above, we define the HelmRelease which will actually deploy traefik into the cluster, with the config and extra ConfigMap we defined above. I save this in my flux repo as traefik/helmrelease-traefik.yaml:
apiVersion: helm.toolkit.fluxcd.io/v2beta1
kind: HelmRelease
metadata:
  name: traefik
  namespace: traefik
spec:
  chart:
    spec:
      chart: traefik
      version: 10.x
      sourceRef:
        kind: HelmRepository
        name: traefik
        namespace: flux-system
  interval: 15m
  timeout: 5m
  releaseName: traefik
  valuesFrom:
  - kind: ConfigMap
    name: traefik-helm-chart-value-overrides
    valuesKey: values.yaml # This is the default, but best to be explicit for clarity
Why not just put config in the HelmRelease?
While it's true that we could embed values directly into the HelmRelease YAML, this becomes unweildy with large helm charts. It's also simpler (less likely to result in error) if changes to HelmReleases, which affect deployment of the chart, are defined in separate files to changes in helm chart values, which affect operation of the chart.
Deploy traefik
Having committed the above to your flux repository, you should shortly see a traefik kustomization, and in the traefik namespace, traefik pods happily running:
demo@shredder:~$ kubectl get pods -n traefik
NAME                                                        READY   STATUS    RESTARTS   AGE
traefik-5b849b4fbd-svbxk                   1/1     Running   0          24h
traefik-5b849b4fbd-xt7vc                   1/1     Running   0          24h
demo@shredder:~$
How do I know it's working?
Test Service
By default, the chart will deploy Traefik in LoadBalancer mode. When you use kubectl to display the service (kubectl get services -n traefik), you'll see the external IP displayed:
demo@shredder:~$ kubectl get services -n traefik
NAME                                       TYPE           CLUSTER-IP       EXTERNAL-IP      PORT(S)                      AGE
traefik                   LoadBalancer   10.152.183.162   172.168.209.1    80:30756/TCP,443:30462/TCP   24h
demo@shredder:~$
Where does the external IP come from?
If you're using k3s's load balancer, the external IP will likely be the IP of the the nodes running k3s. If you're using MetalLB, the external IP should come from the list of addresses in the pool you allocated.
Pointing your web browser to the external IP displayed should result in a 404 page. Congratulations, you have external access to the Traefik ingress controller! 🥳
Test Ingress
Still, you didn't deploy an ingress controller to look at 404 pages! If you used my template repository to start off your flux deployment strategy, then the podinfo helm chart has already been deployed. By default, the podinfo configmap doesn't deploy an Ingress, but you can change this using the magic of GitOps... 🪄
Edit your podinfo helmrelease configmap (/podinfo/configmap-podinfo-helm-chart-value-overrides.yaml), and change ingress.enabled to true, and set the host name to match your local domain name (already configured using External DNS):
    ingress:
      enabled: false
      className: ""
      annotations: {}
        # kubernetes.io/ingress.class: nginx
        # kubernetes.io/tls-acme: "true"
      hosts:
        - host: podinfo.local
To:
    ingress:
      enabled: true
      className: ""
      annotations: {}
        # kubernetes.io/ingress.class: nginx
        # kubernetes.io/tls-acme: "true"
      hosts:
        - host: podinfo.<your domain name>
Commit your changes, wait for a reconciliation, and run kubectl get ingress -n podinfo. You should see an ingress created matching the host defined above, and the ADDRESS value should match the service address of the traefik service.
root@cn1:~# kubectl get ingress -A
NAMESPACE               NAME                                 CLASS    HOSTS                                  ADDRESS        PORTS     AGE
podinfo                 podinfo                              <none>   podinfo.example.com                    172.168.209.1   80, 443   91d
Why is there no class value?
You don't have to define an ingress class if you only have one class of ingress, since typically your ingress controller will assume the default class. When you run multiple ingress controllers (say, nginx and traeifk, or multiple nginx instances with different access controls) then classes become more important.
Now assuming your DNS is correct, you should be able to point your browser to the hostname you chose, and see the beautiful podinfo page! 🥳🥳
Test SSL
Ha, but we're not done yet! We have exposed a service via our load balancer, we've exposed a route to a service via an Ingress, but let's get rid of that nasty "insecure" message in the browser when using HTTPS...
Since you setup SSL certificates, including secret-replicator, you should end up with a letsencrypt-wildcard-cert secret in every namespace, including podinfo.
So once again, alter the podinfo ConfigMap to change this:
      tls: []
      #  - secretName: chart-example-tls
      #    hosts:
      #      - chart-example.local
To this:
      tls:
       - secretName: letsencrypt-wildcard-cert
         hosts:
           - podinfo.<your domain name>
Commit your changes, wait for the reconciliation, and the next time you point your browser at your ingress, you should get a beautiful, valid, officially-signed SSL certificate1! 🥳🥳🥳
Troubleshooting
Are things not working as expected? Watch the traefik's logs with kubectl logs -n traefik -l app.kubernetes.io/name=traefik -f.
Chef's notes 📓
-
The beauty of this design is that the same process will now work for any other application you deploy, without any additional manual effort for DNS or SSL setup! ↩
Tip your waiter (sponsor) 👏
Did you receive excellent service? Want to compliment the chef? (..and support development of current and future recipes!) Sponsor me on Github / Ko-Fi / Patreon, or see the contribute page for more (free or paid) ways to say thank you! 👏
Employ your chef (engage) 🤝
Is this too much of a geeky PITA? Do you just want results, stat? I do this for a living - I'm a full-time Kubernetes contractor, providing consulting and engineering expertise to businesses needing short-term, short-notice support in the cloud-native space, including AWS/Azure/GKE, Kubernetes, CI/CD and automation.
Learn more about working with me here.
Flirt with waiter (subscribe) 💌
Want to know now when this recipe gets updated, or when future recipes are added? Subscribe to the RSS feed, or leave your email address below, and we'll keep you updated.