Shared Storage (Ceph)
While Docker Swarm is great for keeping containers running (and restarting those that fail), it does nothing for persistent storage. This means if you actually want your containers to keep any data persistent across restarts (hint: you do!), you need to provide shared storage to every docker node.
Ingredients
Ingredients
3 x Virtual Machines (configured earlier), each with:
- Support for "modern" versions of Python and LVM
- At least 1GB RAM
- At least 20GB disk space (but it'll be tight)
- Connectivity to each other within the same subnet, and on a low-latency link (i.e., no WAN links)
- A second disk dedicated to the Ceph OSD
- Each node should have the IP of every other participating node hard-coded in /etc/hosts (including its own IP)
Preparation
No more foolish games
Earlier iterations of this recipe (based on Ceph Jewel) required significant manual effort to install Ceph in a Docker environment. In the 2+ years since Jewel was released, significant improvements have been made to the ceph "deploy-in-docker" process, including the introduction of the cephadm tool. Cephadm is the tool which now does all the heavy lifting, below, for the current version of ceph, codenamed "Octopus".
Pick a master node
One of your nodes will become the cephadm "master" node. Although all nodes will participate in the Ceph cluster, the master node will be the node which we bootstrap ceph on. It's also the node which will run the Ceph dashboard, and on which future upgrades will be processed. It doesn't matter which node you pick, and the cluster itself will operate in the event of a loss of the master node (although you won't see the dashboard)
Install cephadm on master node
Run the following on the master node:
MYIP=`ip route get 1.1.1.1 | grep -oP 'src \K\S+'`
curl --silent --remote-name --location https://github.com/ceph/ceph/raw/octopus/src/cephadm/cephadm
chmod +x cephadm
mkdir -p /etc/ceph
./cephadm bootstrap --mon-ip $MYIP
The process takes about 30 seconds, after which, you'll have a MVC (Minimum Viable Cluster)1, encompassing a single monitor and mgr instance on your chosen node. Here's the complete output from a fresh install:
Example output from a fresh cephadm bootstrap
root@raphael:~# MYIP=`ip route get 1.1.1.1 | grep -oP 'src \K\S+'`
root@raphael:~# curl --silent --remote-name --location <https://github.com/ceph/ceph/raw/octopus/src/cephadm/cephadm>

root@raphael:~# chmod +x cephadm
root@raphael:~# mkdir -p /etc/ceph
root@raphael:~# ./cephadm bootstrap --mon-ip $MYIP
INFO:cephadm:Verifying podman|docker is present...
INFO:cephadm:Verifying lvm2 is present...
INFO:cephadm:Verifying time synchronization is in place...
INFO:cephadm:Unit systemd-timesyncd.service is enabled and running
INFO:cephadm:Repeating the final host check...
INFO:cephadm:podman|docker (/usr/bin/docker) is present
INFO:cephadm:systemctl is present
INFO:cephadm:lvcreate is present
INFO:cephadm:Unit systemd-timesyncd.service is enabled and running
INFO:cephadm:Host looks OK
INFO:root:Cluster fsid: bf3eff78-9e27-11ea-b40a-525400380101
INFO:cephadm:Verifying IP 192.168.38.101 port 3300 ...
INFO:cephadm:Verifying IP 192.168.38.101 port 6789 ...
INFO:cephadm:Mon IP 192.168.38.101 is in CIDR network 192.168.38.0/24
INFO:cephadm:Pulling latest docker.io/ceph/ceph:v15 container...
INFO:cephadm:Extracting ceph user uid/gid from container image...
INFO:cephadm:Creating initial keys...
INFO:cephadm:Creating initial monmap...
INFO:cephadm:Creating mon...
INFO:cephadm:Waiting for mon to start...
INFO:cephadm:Waiting for mon...
INFO:cephadm:mon is available
INFO:cephadm:Assimilating anything we can from ceph.conf...
INFO:cephadm:Generating new minimal ceph.conf...
INFO:cephadm:Restarting the monitor...
INFO:cephadm:Setting mon public_network...
INFO:cephadm:Creating mgr...
INFO:cephadm:Wrote keyring to /etc/ceph/ceph.client.admin.keyring
INFO:cephadm:Wrote config to /etc/ceph/ceph.conf
INFO:cephadm:Waiting for mgr to start...
INFO:cephadm:Waiting for mgr...
INFO:cephadm:mgr not available, waiting (1/10)...
INFO:cephadm:mgr not available, waiting (2/10)...
INFO:cephadm:mgr not available, waiting (3/10)...
INFO:cephadm:mgr is available
INFO:cephadm:Enabling cephadm module...
INFO:cephadm:Waiting for the mgr to restart...
INFO:cephadm:Waiting for Mgr epoch 5...
INFO:cephadm:Mgr epoch 5 is available
INFO:cephadm:Setting orchestrator backend to cephadm...
INFO:cephadm:Generating ssh key...
INFO:cephadm:Wrote public SSH key to to /etc/ceph/ceph.pub
INFO:cephadm:Adding key to root@localhost's authorized_keys...
INFO:cephadm:Adding host raphael...
INFO:cephadm:Deploying mon service with default placement...
INFO:cephadm:Deploying mgr service with default placement...
INFO:cephadm:Deploying crash service with default placement...
INFO:cephadm:Enabling mgr prometheus module...
INFO:cephadm:Deploying prometheus service with default placement...
INFO:cephadm:Deploying grafana service with default placement...
INFO:cephadm:Deploying node-exporter service with default placement...
INFO:cephadm:Deploying alertmanager service with default placement...
INFO:cephadm:Enabling the dashboard module...
INFO:cephadm:Waiting for the mgr to restart...
INFO:cephadm:Waiting for Mgr epoch 13...
INFO:cephadm:Mgr epoch 13 is available
INFO:cephadm:Generating a dashboard self-signed certificate...
INFO:cephadm:Creating initial admin user...
INFO:cephadm:Fetching dashboard port number...
INFO:cephadm:Ceph Dashboard is now available at:

        URL: https://raphael:8443/
        User: admin
    Password: mid28k0yg5

INFO:cephadm:You can access the Ceph CLI with:

    sudo ./cephadm shell --fsid bf3eff78-9e27-11ea-b40a-525400380101 -c /etc/ceph/ceph.conf -k /etc/ceph/ceph.client.admin.keyring

INFO:cephadm:Please consider enabling telemetry to help improve Ceph:

    ceph telemetry on

For more information see:

    https://docs.ceph.com/docs/master/mgr/telemetry/

INFO:cephadm:Bootstrap complete.
root@raphael:~#
Prepare other nodes
It's now necessary to tranfer the following files to your other nodes, so that cephadm can add them to your cluster, and so that they'll be able to mount the cephfs when we're done:
| Path on master | Path on non-master |
|---|---|
/etc/ceph/ceph.conf | /etc/ceph/ceph.conf |
/etc/ceph/ceph.client.admin.keyring | /etc/ceph/ceph.client.admin.keyring |
/etc/ceph/ceph.pub | /root/.ssh/authorized_keys (append to anything existing) |
Back on the master node, run ceph orch host add <node-name> once for each other node you want to join to the cluster. You can validate the results by running ceph orch host ls
Should we be concerned about giving cephadm using root access over SSH?
Not really. Docker is inherently insecure at the host-level anyway (think what would happen if you launched a global-mode stack with a malicious container image which mounted /root/.ssh), so worrying about cephadm seems a little barn-door-after-horses-bolted. If you take host-level security seriously, consider switching to Kubernetes :)
Add OSDs
Now the best improvement since the days of ceph-deploy and manual disks.. on the master node, run ceph orch apply osd --all-available-devices. This will identify any unloved (unpartitioned, unmounted) disks attached to each participating node, and configure these disks as OSDs.
Setup CephFS
On the master node, create a cephfs volume in your cluster, by running ceph fs volume create data. Ceph will handle the necessary orchestration itself, creating the necessary pool, mds daemon, etc.
You can watch the progress by running ceph fs ls (to see the fs is configured), and ceph -s to wait for HEALTH_OK
Mount CephFS volume
On every node, create a mountpoint for the data, by running mkdir /var/data, add an entry to fstab to ensure the volume is auto-mounted on boot, and ensure the volume is actually mounted if there's a network / boot delay getting access to the gluster volume:
mkdir /var/data

MYNODES="<node1>,<node2>,<node3>" # Add your own nodes here, comma-delimited
MYHOST=`ip route get 1.1.1.1 | grep -oP 'src \K\S+'`
echo -e "
# Mount cephfs volume \n
raphael,donatello,leonardo:/ /var/data ceph name=admin,noatime,_netdev 0 0" >> /etc/fstab
mount -a
Additional steps on Debian Buster
The above configuration worked on Ubuntu 18.04 without requiring a secret to be defined in /etc/fstab. Other users have reported different results on Debian Buster, however, so consider trying this variation if you encounter error 22:
apt-get install ceph-common
CEPHKEY=`sudo ceph-authtool -p /etc/ceph/ceph.client.admin.keyring`
echo -e "
# Mount cephfs volume \n
raphael,donatello,leonardo:/ /var/data ceph name=admin,secret=$CEPHKEY,noatime,_netdev 0 0" >> /etc/fstab
mount -a
Serving
Sprinkle with tools
Although it's possible to use cephadm shell to exec into a container with the necessary ceph tools, it's more convenient to use the native CLI tools. To this end, on each node, run the following, which will install the appropriate apt repository, and install the latest ceph CLI tools:
curl -L https://download.ceph.com/keys/release.asc | sudo apt-key add -
cephadm add-repo --release octopus
cephadm install ceph-common
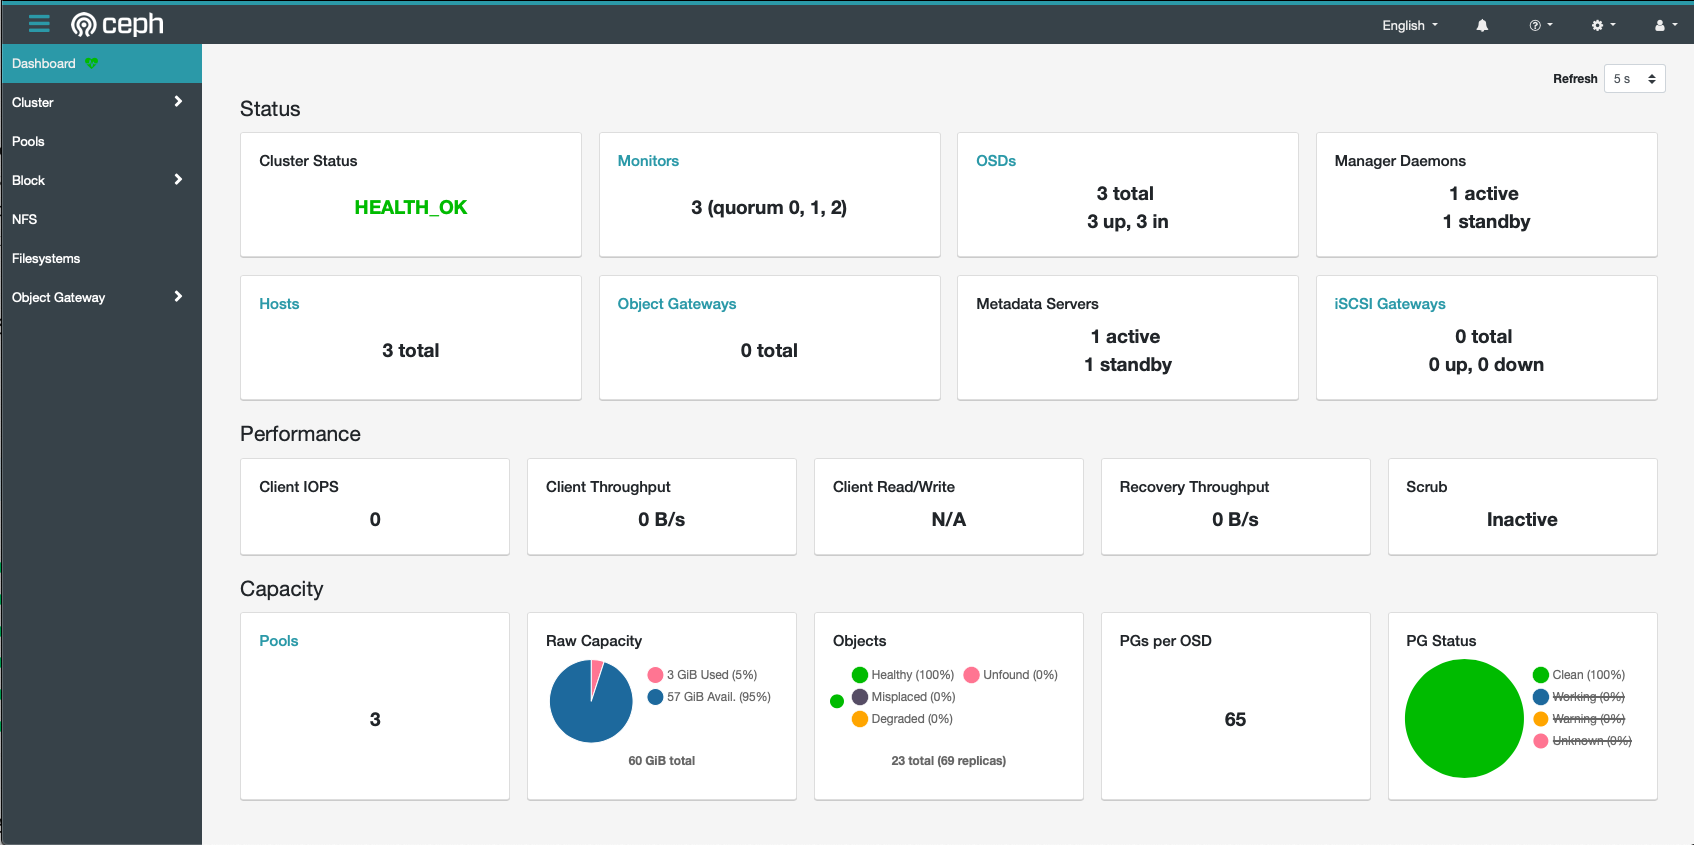
Drool over dashboard
Ceph now includes a comprehensive dashboard, provided by the mgr daemon. The dashboard will be accessible at https://[IP of your ceph master node]:8443, but you'll need to run ceph dashboard ac-user-create <username> <password> administrator first, to create an administrator account:
root@raphael:~# ceph dashboard ac-user-create batman supermansucks administrator
{"username": "batman", "password": "$2b$12$3HkjY85mav.dq3HHAZiWP.KkMiuoV2TURZFH.6WFfo/BPZCT/0gr.", "roles": ["administrator"], "name": null, "email": null, "lastUpdate": 1590372281, "enabled": true, "pwdExpirationDate": null, "pwdUpdateRequired": false}
root@raphael:~#
Summary
What have we achieved?
Summary
Created:
- Persistent storage available to every node
- Resiliency in the event of the failure of a single node
- Beautiful dashboard
The easy, 5-minute install
I share (with sponsors and patrons) a private "premix" GitHub repository, which includes an ansible playbook for deploying the entire Geek's Cookbook stack, automatically. This means that members can create the entire environment with just a git pull and an ansible-playbook deploy.yml 👍
Here's a screencast of the playbook in action. I sped up the boring parts, it actually takes 5 min (you can tell by the timestamps on the prompt):

Chef's notes 📓
-
Minimum Viable Cluster acronym copyright, trademark, and whatever else, to Funky Penguin for 1,000,000 years. ↩
Tip your waiter (sponsor) 👏
Did you receive excellent service? Want to compliment the chef? (..and support development of current and future recipes!) Sponsor me on Github / Ko-Fi / Patreon, or see the contribute page for more (free or paid) ways to say thank you! 👏
Employ your chef (engage) 🤝
Is this too much of a geeky PITA? Do you just want results, stat? I do this for a living - I'm a full-time Kubernetes contractor, providing consulting and engineering expertise to businesses needing short-term, short-notice support in the cloud-native space, including AWS/Azure/GKE, Kubernetes, CI/CD and automation.
Learn more about working with me here.
Flirt with waiter (subscribe) 💌
Want to know now when this recipe gets updated, or when future recipes are added? Subscribe to the RSS feed, or leave your email address below, and we'll keep you updated.